30 May 2014

MappedSuperclass annotation in JPA. Auditing Solution

  • Advance
IIf you have to map JPA entities with auditory fields, maybe use the @MappedSuperclass annotation, would be a good solution to implement less code and organize it better.

@MappedSuperclass is a annotation of java persistance. You can use to define mappings for an abstract or non-persistent superclass. Mapped superclasses cannot define a table, but can define mapping for its attributes and other common persistence behavior.

  • Explanation
If many of our entities have audit fields we define a class with these fields:

@MappedSuperclass
public abstract class AuditDomain implements Serializable {

 /**
  * serialVersionUID.
  */
 private static final long serialVersionUID = 6570818726931423004L;

 /**
  * Logical Deletion.
  */
 @Column(name = "LOGICAL_DEL")
 private Boolean logicalDeletion;

 /**
  * Date insert.
  */
 @Column(name = "DATE_INSERT")
 @Temporal(TemporalType.TIMESTAMP)
 private Date dateInsert;
 
 /**
  * Date update.
  */
 @Column(name = "DATE_UPDATE)
 @Temporal(TemporalType.TIMESTAMP)
 private Date dateUpdate;
 
 /**
  * Role insert.
  */
 @Column(name = "ROLE_INSERT")
 private String roleInsert;
 
 /**
  * Role update.
  */
 @Column(name = "ROLE_UPDATE")
 private String roleUpdate;
 
        /**
  * User insert.
  */
 @Column(name = "USER_INSERT")
 private String userInsert;
 
 /**
  * User update.
  */
 @Column(name = "USER_UPDATE")
 private String userUpdate;
 

 //getters and setters

}

To every entity with audit fields, we only have to make them to extend from our class AuditDomain, and all these fields will be added by inheritance. We saved encrypt all audit fields in all institutions. Now our code will be more readable and robust.

public class UserOnLine extends AuditDomain {
 
 private static final long serialVersionUID = 4892071387935963546L;
 
 @Id
 @Column(name = "USER_ON_LINE_ID")
 private Long id;
 
 @Column(name = "NAME")
 private String name;

        @Column(name = "EMAIL")
 private String email;

        @Column(name = "TELEPHONE")
 private String telephone;

        //getters and setters

8 May 2014

Websockets: How to use it in order to get real time data in a web browser


  • Advance
The main idea with this project is just learning how to achieve the effect of real time data appearing in the web browser, without need of refreshing the web browser.

How does it achieved? Using websockets technology, spring framework and rabbitmq broker message with stomp support and with a bit of html5 and Jquery.

  • Explanation


The example project is based in knowing where the buses of Dublin city are in every moment. Luckily Dublin city has every bus connected to internet, so every customer can connect to internet during the trip, and also every bus is connected to a system to send their position to the system.

That system is available using a REST api provided by Dublin city, so, where is the trick? The trick is you need to ask periodically to the system about new data, enqueue the data to the rabbitmq-stomp broker message and with a bit of jquery code the effect is done.

  • Conclusions
I think the code is self-explainable, so you can download it and get the conclusions for your own. Enjoy!

  • About the author:
This post is a contribution made by Alonso Isidoro Román, a Software Engineer from Badajoz (Spain). You can follow or contact with Alonso Isidoro Román through these social networks:


26 Apr 2014

Junit Best Practices

  • Advance

In the new project that I'm working now, the client asked me about if I could define a set of rules to make all the developers goes in the same direction, when they starting to write unitary test.

Using my experience as developer, and reading others blogs in internet related to best practices, I found an entry in a blog that represent that main idea I always had when I think in unitary test.

Using that blog as a starting point, but giving my personal touch, I defined a set of minimun rules to follow for every developer at time to write Junit test.

  • Explanation

  • TEST ONLY ONE CODE UNIT AT A TIME

When we try to test a unit of code, this unit can have multiple use cases. We should always test each use case in separate test case. For example, if we are writing test case for a function which is supposed to take two parameters and should return a value after doing some processing, then different use cases might be:

1. First parameter can be null. It should throw Invalid parameter exception.
2. Second parameter can be null. It should throw Invalid parameter exception.
3. Both can be null. It should throw Invalid parameter exception.
4. Finally, test the valid output of function. It should return valid pre-determined output.

This helps when you do some code changes or do refactoring then to test that functionality has not broken, running the test cases should be enough. Also, if you change any behaviour then you need to change single or least number of test cases.


  • MAKE EACH TEST INDEPENDENT TO ALL THE OTHERS


Do not make chain of unit test cases. It will prevent you to identify the root cause of test case failures and you will have to debug the code. Also, it creates dependency, means if you have to change one test case then you need to make changes in multiple test cases unnecessarily.


  • MOCK OUT ALL EXTERNAL SERVICES AND STATE

Otherwise, behaviour in those external services overlaps multiple tests, and state data means that different unit tests can influence each other’s outcome.
We have to be sure each test resets the relevant statics to a known state before it runs. We have to try avoiding dependences between tests and systems. And the order of the @Test methods does not be affected by a concrete order of execution.

You can use a lot of frameworks related to Mocking and with a clear integration with Junit. In internet you can find examples and best practices about how to Mock Services. At the end, the decision to select one or another framework is up to you.

  • NAME YOUR UNIT TESTS CLEARLY AND CONSISTENTLY

This is the most important point to keep remember and keep following. We must name our test cases on what they actually do and test. Test case naming convention which uses class names and method names for test cases name is never a good idea. Every time you change the method name or class name, you will end up updating a lot of test cases as well.
But, if our test cases names are logical i.e. based on operations then you will need almost no modification because most possibly application logic will remain same.
E.g. Test case names should be like (EmployeeTest is our Junit class):

1) EmployeeTest.create_NullId_ShouldThrowException

2) EmployeeTest.create_NegativeId_ShouldThrowException

3) EmployeeTest.create_DuplicateId_ShouldThrowException

4) EmployeeTest.create_ValidId_ShouldPass


  • AIM FOR EACH UNIT TEST METHOD TO PERFORM EXACTLY ONE ASSERTION

We should try to test only one thing in one test case. Do not test multiple things using assertions in single test case. This way, if some test case fails, you know exactly what went wrong.


  • CREATE UNIT TESTS THAT TARGET EXCEPTIONS

If some of your test cases, which expect the exceptions to be thrown from application, use “expected” attribute like this. Try avoiding catching exception in catch block and using fail/ or asset method to conclude the test.


  • DO NOT PRINT ANYTHING OUT IN UNIT TESTS

If you are correctly following all the guidelines, then you will never need to add any print statement in your test cases. If you feel like having one, revisit your test case(s).

  • Conclusions

We could include more rules to define our set of best practices when we develop junit test. My opinion about junit is not use junit as way to make functional testing, or to detect regressions, but always is good to define a minimum set of best practices. At the end, you should write your unitary test for your needs thinking in the best way to do that.

28 Feb 2014

Configure ehcache with JPA

  • Advance


Many times in our projects we need to access static data tables, sometimes accessing all the data and sometimes recovering one key element. These calls are the same data again and again, consuming time accessing the database. An important part of our developments is the speed and database accesses are a major penalty. Let's see how to improve the speed using ehcache in accessing methods based on static data tables

  • Explanation


In our repository we created the example working properly SVN repository. It´s a maven proyect and We need a local mysql database to make it work. The script of our example is in the Main.java in the svm. With the script you can create you the schema, table and data necessary. To model the table 'Vehicle' will use JPA.

@Entity
@Table(name = "VEHICLES")
public class Vehicle implements Serializable {
 
 private static final long serialVersionUID = -4295164392260587011L;

 public Vehicle() {
  super();
 }
 
 /**
  * Id
  */
 @Id
 @Column(name = "IDVEHICLE")
 private Integer id;
 
 /**
  * Name
  */
 @Column(name = "NAME", nullable = false, length = 45)
 private String name;
 
 /**
  * Name
  */
 @Column(name = "DESCRIPTION", length = 150)
 private String description;
 
 /**
  * Constructor
  * @param id
  * @param name
  * @param description
  */
 public Vehicle(Integer id, String name, String description) {
  super();
  this.id = id;
  this.name = name;
  this.description = description;
 }
  
 /**
  * @return the id
  */
 public Integer getId() {
  return id;
 }


 /**
  * @param id the id to set
  */
 public void setId(Integer id) {
  this.id = id;
 }

 /**
  * @return the name
  */
 public String getName() {
  return name;
 }

 /**
  * @param name the name to set
  */
 public void setName(String name) {
  this.name = name;
 }

 /**
  * @return the description
  */
 public String getDescription() {
  return description;
 }

 /**
  * @param description the description to set
  */
 public void setDescription(String description) {
  this.description = description;
 }

 @Override
 public String toString() {
  return "Vehicle [id=" + this.id + ", name=" + this.name + ", description=" + this.description + "]";
 }
}
And we create a DAO with the methods getAll y getVehicle. We can see how we use the @Cacheable annotation to indicate that the method we want to be cached
@Component("vehicleDAO")
@Repository
public class VehicleDAO extends AbstractJpaDAO{
 
 public VehicleDAO(){
  setClassName(Vehicle.class);
 }
 
 
 @Cacheable(value = "vehicleCache")
 public List getAll() {
  
  List lstVehicles0 = this.findAll();
  
  return lstVehicles0;
  
 }
 
 @Cacheable(value = "vehicleCache", key = "#id")
 public Vehicle getVehicle(Integer id) {
  
  Vehicle objVehicle = this.findOne(id);
     
  return objVehicle;
 }
 
 public void insert(Vehicle vehicle) {
  
  this.save(vehicle);
 }
 
}
ehcache need a configuration file, ehcache.xml, which will in the classpath together spring-config.xml
<?xml version="1.0" encoding="UTF-8"?>
<ehcache xmlns:xsi="http://www.w3.org/2001/XMLSchema-instance"
 xsi:noNamespaceSchemaLocation="http://ehcache.org/ehcache.xsd"
 updateCheck="false">
 
 <!-- Default Cache Configuration, with name 'default' -->
 <defaultCache maxElementsInMemory="50" eternal="false" 
               overflowToDisk="false" memoryStoreEvictionPolicy="LFU" />
 
 <cache name="vehicleCache" maxElementsInMemory="50" eternal="false" 
        overflowToDisk="false" memoryStoreEvictionPolicy="LFU" />

</ehcache>
In this configuration file we create the cache "vehicleCache", which will be used for our methods in VehicleDAO. Now, we show how would the spring-config.xml
<?xml version="1.0" encoding="UTF-8"?>
<beans xmlns="http://www.springframework.org/schema/beans"
 xmlns:xsi="http://www.w3.org/2001/XMLSchema-instance" 
 xmlns:tx="http://www.springframework.org/schema/tx"
 xmlns:cache="http://www.springframework.org/schema/cache"
 xmlns:context="http://www.springframework.org/schema/context"
 xsi:schemaLocation="
    http://www.springframework.org/schema/beans 
    http://www.springframework.org/schema/beans/spring-beans-3.0.xsd
    http://www.springframework.org/schema/cache 
    http://www.springframework.org/schema/cache/spring-cache.xsd
    http://www.springframework.org/schema/tx
    http://www.springframework.org/schema/tx/spring-tx.xsd
    http://www.springframework.org/schema/context
    http://www.springframework.org/schema/context/spring-context-3.0.xsd">
 
    <cache:annotation-driven />
    
    
    <bean id="entityManagerFactory" class="org.springframework.orm.jpa.LocalContainerEntityManagerFactoryBean">
       <property name="dataSource" ref="dataSource" />
       <property name="packagesToScan" value="geekzpacho.examples.ehcache" />
       <property name="jpaVendorAdapter">
          <bean class="org.springframework.orm.jpa.vendor.HibernateJpaVendorAdapter">
             <property name="showSql" value="false" />
             <property name="databasePlatform" value="org.hibernate.dialect.MySQLDialect" />
          </bean>
       </property>
    </bean>
    
    <bean id="dataSource" class="org.springframework.jdbc.datasource.DriverManagerDataSource">
       <property name="driverClassName" value="com.mysql.jdbc.Driver" />
       <property name="url" value="jdbc:mysql://localhost:3306/geekzpacho" />
       <property name="username" value="root" />
       <property name="password" value="root" />
    </bean>
    
    <bean id="txManager" class="org.springframework.orm.jpa.JpaTransactionManager">
       <property name="entityManagerFactory" ref="entityManagerFactory" />
    </bean>
    <tx:annotation-driven transaction-manager="txManager" />
    
    
    <context:component-scan base-package="geekzpacho.examples.ehcache" />
    
    <bean id="cacheManager" class="org.springframework.cache.ehcache.EhCacheCacheManager">
        <property name="cacheManager" ref="ehcache" />
    </bean>
    
    <bean id="ehcache" class="org.springframework.cache.ehcache.EhCacheManagerFactoryBean">
        <property name="configLocation" value="classpath:ehcache.xml" />
    </bean>
        
     <bean id="vehicleDAO" class="geekzpacho.examples.ehcache.VehicleDAO">
     </bean>
</beans>
Para comprobar la eficacia de ehcache y que todo sea correcto. Lanzamos en el Main.jav dos veces cada método dao (getAll y getVehicle), esperando que en la segunda llamada el tiempo de ejecución sea menor. Este es el resultado:
*** SELECT ALL ***
First call without cache: 319246710 ns
Vehicle [id=1, name=Car, description=Motor vehicle small or medium size, used for carrying people and can accommodate no more than nine seats.]
Vehicle [id=2, name=MotorBike, description=Two-wheeled motor vehicle with one or two saddles and sometimes with sidecar.]
Vehicle [id=3, name=Truck, description=Four or more vehicle wheels which is used to transport heavy loads.]
Second call with cache: 597881 ns
Vehicle [id=1, name=Car, description=Motor vehicle small or medium size, used for carrying people and can accommodate no more than nine seats.]
Vehicle [id=2, name=MotorBike, description=Two-wheeled motor vehicle with one or two saddles and sometimes with sidecar.]
Vehicle [id=3, name=Truck, description=Four or more vehicle wheels which is used to transport heavy loads.]
**************
*** SELECT BY ID ***
First call without cache: 57306107 ns
Vehicle [id=1, name=Car, description=Motor vehicle small or medium size, used for carrying people and can accommodate no more than nine seats.]
Second call with cache: 113113 ns
Vehicle [id=1, name=Car, description=Motor vehicle small or medium size, used for carrying people and can accommodate no more than nine seats.]
**************

  • Conclusions

Using ehcache in 533 getall method is faster in the second than in the first iteration. The same goes for getVehicle method. In conclusion, if you perform an analysis of static data tables that are accessed in greater numbers in our application we can cache the query methods to get better response time and our development faster.

21 Feb 2014

Copying objects of different classes with Dozer

  • Advance


Sometimes we need to copy the contents of a bean to another. If the source and target are of the same class we can use a copy constructor or an existing util class like org.apache.commons.beanutils.BeanUtils from Apache Commons BeanUtils or org.springframework.beans.BeanUtils from Spring Framework. This last solution is only recommended if you're in a Java application built with this framework.
However in many situations we need to copy some or all the attributes from an object of class A in an object of class B. It's in this case when we need to build a manual mapper using the getter and setter methods or a library like Dozer. It allows you to customize easily the mapping of the attributes of two objects.

  • Explanation


We have created a little project in the SVN repository where we have simulated a hierarchy of a value object with a collection of children and their matching business objects with a similar form. In the following lines we are going to explain how Dozer can help us to implement a mapper quickly and configuring it with only a XML file. The mapping classes are very similar in field naming but we have change the name of the identifiers intentionally. We have omitted the equals and hashCode methods to be clearer. Finally, the samples are shown as unit tests but the data bean initialization methods have been omitted.

Value objects


public class ChildVO implements Serializable {

 private static final long serialVersionUID = -3066509911454147138L;

 protected Integer persistenceId;
 
 protected Double price;
 
 protected ParentVO parentVO;

 public Integer getPersistenceId() {
  return persistenceId;
 }

 public void setPersistenceId(Integer persistenceId) {
  this.persistenceId = persistenceId;
 }

 public Double getPrice() {
  return price;
 }

 public void setPrice(Double price) {
  this.price = price;
 }

 public ParentVO getParentVO() {
  return parentVO;
 }

 public void setParentVO(ParentVO parentVO) {
  this.parentVO = parentVO;
 }

 /* ... */
}

public class ParentVO implements Serializable {

 private static final long serialVersionUID = 440303735656145958L;

 protected Integer persistenceId;
 
 protected String name;
 
 protected Set childVOs;

 public Integer getPersistenceId() {
  return persistenceId;
 }

 public void setPersistenceId(Integer persistenceId) {
  this.persistenceId = persistenceId;
 }

 public String getName() {
  return name;
 }

 public void setName(String name) {
  this.name = name;
 }

 public Set getChildVOs() {
  return childVOs;
 }

 public void setChildVOs(Set childVOs) {
  this.childVOs = childVOs;
 }

 /* ... */
}

Business objects


public class ChildBO implements Serializable {

 private static final long serialVersionUID = -3066509911454147138L;

 protected Integer businessId;
 
 protected Double price;
 
 protected ParentBO parentBO;
 
 public Integer getBusinessId() {
  return businessId;
 }

 public void setBusinessId(Integer businessId) {
  this.businessId = businessId;
 }

 public Double getPrice() {
  return price;
 }

 public void setPrice(Double price) {
  this.price = price;
 }

 public ParentBO getParentBO() {
  return parentBO;
 }

 public void setParentBO(ParentBO parentBO) {
  this.parentBO = parentBO;
 }

 /* ... */
}

public class ParentBO implements Serializable {

 private static final long serialVersionUID = 440303735656145958L;

 protected Integer businessId;
 
 protected String name;
 
 protected Set childBOs;

 public Integer getBusinessId() {
  return businessId;
 }

 public void setBusinessId(Integer businessId) {
  this.businessId = businessId;
 }

 public String getName() {
  return name;
 }

 public void setName(String name) {
  this.name = name;
 }

 public Set getChildBOs() {
  return childBOs;
 }

 public void setChildBOs(Set childBOs) {
  this.childBOs = childBOs;
 }

 /* ... */
}
  1. Mapper initialization
The mapper should be initialized to use it. Use the following snippet to configure it with a XML file.
 protected final DozerBeanMapper mapper;

 public DozerMappingTest() {
  List myMappingFiles = new ArrayList();
  myMappingFiles.add("dozerBeanMapping.xml");
  this.mapper = new DozerBeanMapper();
  this.mapper.setMappingFiles(myMappingFiles);
 }
  1. Map an object to another of the same class (simple copy)
The following example shows how to copy the properties of a object to another instance.

/**
 * This test shows the copy capability of the library. It doesn't need a XML configuration.
 */
@Test
public void testCopySimpleClass() {
 ChildVO vo = fillChildVO();
 
 ChildVO voPrime = mapper.map(vo, ChildVO.class);
 
 assertThat(vo, equalTo(voPrime));
}
  1. Map an object to another of the same class with a collection of children objects (deep copy)
The following example shows a deep copy of a hierarchy of objects.

/**
 * This test shows the copy with a child element in a collection. It doesn't need a XML configuration.
 */
@Test
public void testCopyParentClass() {
 ParentVO parentVo = fillParentVO();
 ChildVO childVo = fillChildVO(); 
 linkParentAndChildVO(parentVo, childVo);
  
 ParentVO parentVoPrime = mapper.map(parentVo, ParentVO.class);
 
 assertThat(parentVoPrime.getChildVOs(), notNullValue());
 assertThat(parentVoPrime.getChildVOs().size(), equalTo(1));
 assertThat(parentVo, equalTo(parentVoPrime));
}
  1. Map an object to another of different class (simple copy)
In this case the source and target objects are of different classes. The attributes with the same name and type are automatically mapped, but for the different ones we need to specify what are the matching names.

/**
 * This test shows the copy of the simple properties of a class to another. We need to add the following XML to run properly:
 * <mapping>
 *  <class-a>gazpachito.examples.dozer.persistence.ChildVO</class-a>
 *  <class-b>gazpachito.examples.dozer.facade.ChildBO</class-b>
 *  <field>
 *   <a>persistenceId</a>
 *   <b>businessId</b>
 *  </field>
 * </mapping>
 */
@Test
public void testMapSimpleClass() {
 ChildVO childVo = fillChildVO(); 
 
 ChildBO childBo = mapper.map(childVo, ChildBO.class);
 
 assertThat(childBo.getBusinessId(), notNullValue());
 assertThat(childBo.getPrice(), notNullValue());
 assertThat(childBo.getParentBO(), nullValue());
}
  1. Map an object to another of different class with a collection of children objects (deep copy)
For a deep copy we only have to complete the field mappings.

/**
 * This test shows the copy of the properties of the parent class and a child. We need the following XML:
 *  <mapping>
 *  <class-a>gazpachito.examples.dozer.persistence.ChildVO</class-a>
 *  <class-b>gazpachito.examples.dozer.facade.ChildBO</class-b>
 *  <field>
 *   <a>persistenceId</a>
 *   <b>businessId</b>
 *  </field>
 *  <field>
 *   <a>parentVO</a>
 *   <b>parentBO</b>
 *  </field>
 * </mapping>
 * <mapping>
 *  <class-a>gazpachito.examples.dozer.persistence.ParentVO</class-a>
 *  <class-b>gazpachito.examples.dozer.facade.ParentBO</class-b>
 *  <field>
 *   <a>persistenceId</a>
 *   <b>businessId</b>
 *  </field>
 *  <field>
 *   <a>childVOs</a>
 *   <b>childBOs</b>
 *  </field>
 * </mapping>
 */
@Test
public void testMapParentClass() {
 ParentVO parentVO = fillParentVO();
 ChildVO childVO = fillChildVO(); 
 linkParentAndChildVO(parentVO, childVO);
 
 ParentBO parentBo = mapper.map(parentVO, ParentBO.class);
 
 assertThat(parentBo, notNullValue());
 assertThat(parentBo.getBusinessId(), notNullValue());
 assertThat(parentBo.getName(), notNullValue());
 Set childBos = parentBo.getChildBOs();
 assertThat(childBos, notNullValue());
 assertThat(childBos.size(), equalTo(1));
 ChildBO childBo = parentBo.getChildBOs().iterator().next();
 assertThat(childBo.getBusinessId(), notNullValue());
 assertThat(childBo.getPrice(), notNullValue());
 assertThat(childBo.getParentBO(), notNullValue());
 assertThat(childBo.getParentBO(), equalTo(parentBo));
}
  1. Performance
We have compared the Dozer mapper with a manual mapper to measure the overheight of it usage. The profiling library used is JETM with a very basic configuration. The average results were the following:
  • Dozer mapper
|-----------------------|------|---------|-------|-----------|------------|
|   Measurement Point   |   #  | Average |  Min  |    Max    |    Total   |
|-----------------------|------|---------|-------|-----------|------------|
| DozerParentMapper:map | 1000 |  14,627 | 4,479 | 2.107,324 | 14.626,801 |
|-----------------------|------|---------|-------|-----------|------------|
  • Manual mapper
|------------------------|------|---------|-------|-----------|-----------|
|    Measurement Point   |   #  | Average |  Min  |    Max    |   Total   |
|------------------------|------|---------|-------|-----------|-----------|
| ManualParentMapper:map | 1000 |   2,752 | 0,151 | 2.368,851 | 2.751,547 |
|------------------------|------|---------|-------|-----------|-----------|

As you can see, the manual mapper is approximately six times faster but this test is a bit vague.

  • Conclusions

The usage of a mapping library can save us many time in development process but it adds a little overhead. You have to consider it usage but the flexibility of this library eases the mapping of complex classes. We recommend to read the development guide to take advantage of Dozer because this guide only covers a bit of the features of this great Java library.

Thanks to my partner Fernando for the idea to do a performance test.

14 Feb 2014

Developing a Soap Service Using Apache Cxf and Jaxb annotations

  •  Advance:
In a passed post, you saw how to developan application using the “MethodTemplate” Design Pattern. Now we’re going to develop a Service tier for this Business tier developed in the past.
In this post, you can find a running application to see how the Service works, using a SOAP implementation built with the Apache cxf library and Jaxb Annotations

Rev: 6.

Also I would like to say, you can deploy this Service in an Application Server (I have selected Tomcat 7.0) and use SoapUI to send request to the Server (I have included a SoapUI Project in the SVN for that purpose)

  •  Explanation
We want to develop a Service Tier for an Existing Business Tier, but we want to reutilize all the code previously developed, also I don’t want to import the code as a jar or as an external Java Project downloaded in the workspace. For that purpose, we have published the Business Tier in the Maven Central Repository. Now you can download the project as a Maven Dependency and use it.

For the checkout of the code, you should know this example was developed as a Maven Project, under 1.7 JDK and Spring 3.0.

For this example I have selected Apache cxf because with a little set of Annotations you could develop a Service as follows

o API Tier
Object
Description
ManageVehicleRequest
This object, represent a request to consume themanageVehicleoperation existing in the Vehicle Service.
ManageVehicleResponse
This object, represent a response from the Service Vehicle after themanageVehicleoperation has been finished
VehicleService
The definition of our Service including all the operations we want to publish in our SOAP Architechture. In this case, we only have one operation (manageVehicle)

o SERVICE Tier
Object
Description
VehicleServiceImpl
This is only the implementation of our Service.

o CODE snapshots
VehicleService
@WebService(name = "VehicleService")
public interface VehicleService {

 @WebMethod
 String getVersion();

 @WebMethod
 ManageVehicleResponse manageVehicle(ManageVehicleRequest request);

}

As you can see, we only have to use two annotations, the first one, is only to declare our Interface as a Service (with a concrete name). The second annotation is used to indicate what methods must be published within the Service


ManageVehicleRequest
@XmlType(name = "ManageVehicleRequest")
@XmlSeeAlso({ EngineVehicleDTO.class, AnimalVehicleDTO.class })
public class ManageVehicleRequest implements Serializable {

 /**
  * 
  */
 private static final long serialVersionUID = 1144868850362615114L;

 private VehicleDTO vehicle;

 /**
  * @return the vehicle
  */
 public VehicleDTO getVehicle() {
  return vehicle;
 }

 /**
  * @param vehicle
  *            the vehicle to set
  */
 public void setVehicle(VehicleDTO vehicle) {
  this.vehicle = vehicle;
 }

}

This object will be used to pass the information from the outside to the Service. In this case we should include inside this object a VehicleDTO instance.

It’s considered as a good practice to use the @XmlType annotation to give a name to our object. If you don’t follow this tip, you are delegating in the framework the names for all the XML elements within of the namespace used by the Service. And maybe you would have errors at deployment time.

As you can see, VehicleDTO is a parent object of EngineVehicleDTO and AnimalVehicleDTO, our operation has to work with these child objects, this is the purpose followed by the @XmlSeeAlso annotation. This annotation says to the framework that at deployment time, these objects must be part of the WSDL. If you don’t use that annotation, you only could send instances from VehicleDTO.


ManageVehicleResponse
package gazpachito.examples.services.cxf.vehicle.api.response;

import java.io.Serializable;

import javax.xml.bind.annotation.XmlType;

@XmlType(name = "ManageVehicleResponse")
public class ManageVehicleResponse implements Serializable {

 /**
  * 
  */
 private static final long serialVersionUID = -7879894326252286663L;

 private String errorMessage;

 /**
  * @return the errorMessage
  */
 public String getErrorMessage() {
  return errorMessage;
 }

 /**
  * @param errorMessage
  *            the errorMessage to set
  */
 public void setErrorMessage(String errorMessage) {
  this.errorMessage = errorMessage;
 }

}


This object will be used to return the information from the Service to the outside. In this case
we only just want to pass an error message, but in fact, we could return whatever you want, collections or a complex object maybe (with the exception of Maps)


VehicleServiceImpl
public class VehicleServiceImpl implements VehicleService {

 @Autowired
 private VehicleFacade vehicleFacadeImpl;

 @Override
 public String getVersion() {

  String version = ResourceBundle.getBundle("vehicle").getString(
    "vehicle.version");
  return version;
 }

 @Override
 public ManageVehicleResponse manageVehicle(ManageVehicleRequest request) {
  ManageVehicleResponse response = new ManageVehicleResponse();

  if (request != null && request.getVehicle() != null) {

   VehicleEnum template = null;

   if (request.getVehicle() instanceof AnimalVehicleDTO) {
    template = VehicleEnum.ANIMAL;
   } else if (request.getVehicle() instanceof EngineVehicleDTO) {
    template = VehicleEnum.ENGINE;
   }

   try {
    this.vehicleFacadeImpl.manageVehicle(request.getVehicle(),
      template);
   } catch (FacadeException e) {

    response.setErrorMessage(e.getMessage());
   }
  }
  return response;
 }

This is the implementation of our service. As you can see, I only have  used a Spring annotation to inject the facade developed in other post. And we only need to make an implementation for the two operations publisheds in the Interface VehicleService.

About the “getVersion” method, just return the version extracted from a properties file (using the ${project} variable inside this properties file). The “manageVehicle” method only validate the input from the outside before this information sent to Facade


  •    Conclusions

As you can see, using a little set of JAXB annotations, we can develop a WebService based in a SOAP Architecture. In this post I only have introduced enough annotations to show you how to develop a Service in an easy way, but you can use more JAXB annotations and different combinations between them to go further.

But this framework has a weakness. You have to write a little of XML in a configuration file to define the endpoint of all your Services (at least in the version chosen for this example). So you can’t forgive the configuration files and the configuration of the endpoint sometimes is a hard task.

7 Feb 2014

Introduction to application logging

  • Advance

Logging is an design mechanism that allow us to follow the events of the system and tracing the application for debugging purposes. A log is a sorted set of entries with an importance level and sometimes the instant of the event, the class that caused it and a description. The entries use to have one line although multi-line entries are allowed.
The most common entry levels are the following:

  • ERROR: This kind of entries contains information about a important problem in the application that could cause a malfunction and should be reviewed. All runtime errors and unexpected exceptions should be logged at this level.
  • WARN: At this level should be included all unexpected events that doesn't break the normal working. These messages should be attended as soon as possible.
  • INFO: The information entries notifies about the start and stop of a long process or subsystem. It's usual show another meaningful messages but you shouldn't abuse to avoid the generation of a heavy log.
  • DEBUG: This is a detailed information use to follow the application flow. This is only used to debug the application and these messages shouldn't be shown in a production environment.
  • TRACE: A more fine coarse information about the application flow. This level could be used to notify the start and stop method for example.
In a development environment it's very common to show all levels, but in a production environment it must be limited to INFO level to avoid overloading of the system and unnecessary information. It's also possible to set a different logging level depending on package namespace.
Finally, you can push the messages on a console, a file or even a email.

  • Explanation

Java includes a logging API in the package java.util.logging (also called JUL) that allows you to perform a basic logging. Nevertheless, most important software project doesn't use it due to the existence of many other better libraries. Some of them are Apache Commons LoggingLog4j or Logback.
With the purpose of unifying all the traces when you have several logging libraries in a project Slf4j has been done. This work as a Facade, and this Facade include Adaptors and binding extracted from the most popular logging libraries you can configure in your project.
You can find many guides of how to configure an unique logging library for your project. In this article we are going to study some cases and how to find an efficient solution.

  1. Starting a new development with Slf4j

If you are starting a new project, the best option is to make the logging calls by the Slf4j API façade. This allows you to use the underlying framework that you prefer and change it only importing another libraries. In this page it's described how to configure your project to use the desired implementation. As you can see, the recommended implementation is Logback, because it's a native implementation of that API and it doesn't overhead the system.
Let's have a look of how to configure a Java application to log on this way:
  1. Prepare a new Maven project and set the pom.xml as this.
 <project xmlns="http://maven.apache.org/POM/4.0.0" xmlns:xsi="http://www.w3.org/2001/XMLSchema-instance"  
      xsi:schemaLocation="http://maven.apache.org/POM/4.0.0 http://maven.apache.org/xsd/maven-4.0.0.xsd">  
      <modelVersion>4.0.0</modelVersion>  
      <groupId>gazpachito.examples</groupId>  
      <artifactId>logging</artifactId>  
      <version>0.0.1-SNAPSHOT</version>  
      <properties>  
           <logback.version>1.0.13</logback.version>  
      </properties>  
      <dependencies>  
           <dependency>  
                <groupId>ch.qos.logback</groupId>  
                <artifactId>logback-classic</artifactId>  
                <version>${logback.version}</version>  
           </dependency>  
      </dependencies>  
 </project> 

This configuration will download the Logback jars and the Slf4j API.

 [INFO] --- maven-dependency-plugin:2.8:tree (default-cli) @ logging ---  
 [INFO] gazpachito.examples:logging:jar:0.0.1-SNAPSHOT           
 [INFO] \- ch.qos.logback:logback-classic:jar:1.0.13:compile        
 [INFO]  +- ch.qos.logback:logback-core:jar:1.0.13:compile        
 [INFO]  \- org.slf4j:slf4j-api:jar:1.7.5:compile             
  1. Copy the following code.
package gazpachito.examples.logging;  
 import org.slf4j.Logger;  
 import org.slf4j.LoggerFactory;  
 /**  
  * @author jmporterog  
  */  
 public class NewApplicationLoggingExample {  
      private static final Logger LOGGER = LoggerFactory.getLogger(NewApplicationLoggingExample.class);  
      /**  
       * @param args  
       */  
      public static void main(String[] args) {  
           LOGGER.trace("TRACE message");  
           LOGGER.debug("DEBUG message");  
           LOGGER.warn("WARN message");  
           LOGGER.info("INFO message");  
           LOGGER.error("ERROR message");  
      }  
 }  
  1. Run the application. The output will be the next:
 19:16:54.145 [main] DEBUG g.e.l.NewApplicationLoggingExample - DEBUG message  
 19:16:54.148 [main] WARN g.e.l.NewApplicationLoggingExample - WARN message  
 19:16:54.149 [main] INFO g.e.l.NewApplicationLoggingExample - INFO message  
 19:16:54.149 [main] ERROR g.e.l.NewApplicationLoggingExample - ERROR message  

As you can see, Logback includes a default configuration that logs the messages to the console with a debug level and the format contains the time and an abbreviated package name with the class name.
Like many others logging libraries, all those parameters are configurable by a configuration file. Logback looks for a lookback-test.xml file in the classpath and if it's not found, try to load a lookback.xml file. This feature is very useful if you use Maven because you can use a different file for the testing classes.

The logger is configured as explained as following:

  • The method getLogger of the LoggerFactory class returns a Logger instance. It looks for an implementation of the LoggerFactoryBinder. In the case of Logback it's included in logback-classic.jar and an adaptor isn't needed. 
  • When we call a method of the logger it's executed by the implementation of the Logback Logger class.

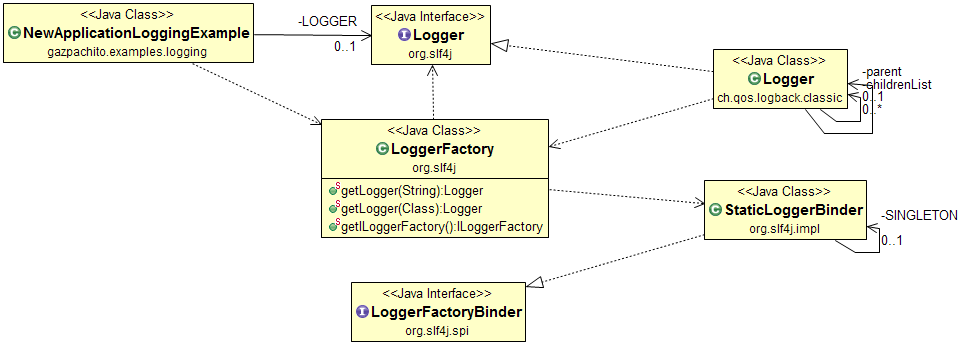
Figure 1: Class diagram of the related classes in logging.

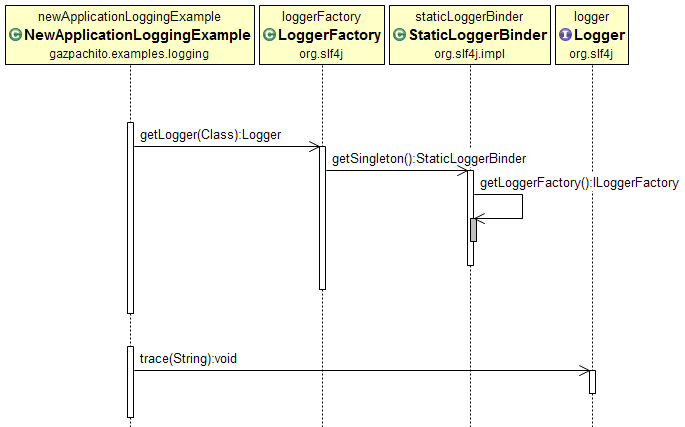
Figure 2: Sequence diagram of a trace logging.

You have a detailed information about configuring Logback in this link. Let's have a look a sample configuration file that increases the logging level to TRACE and sends messages to an email too. First of all you need to add the JavaMail dependency to the pom.xml file:

<project xmlns="http://maven.apache.org/POM/4.0.0" xmlns:xsi="http://www.w3.org/2001/XMLSchema-instance"  
      xsi:schemaLocation="http://maven.apache.org/POM/4.0.0 http://maven.apache.org/xsd/maven-4.0.0.xsd">  
      <modelVersion>4.0.0</modelVersion>  
      <groupId>gazpachito.examples</groupId>  
      <artifactId>logging</artifactId>  
      <version>0.0.1-SNAPSHOT</version>  
      <properties>  
           <logback.version>1.0.13</logback.version>  
           <javax.mail.version>1.4.7</javax.mail.version>  
      </properties>  
      <dependencies>  
           <dependency>  
                <groupId>ch.qos.logback</groupId>  
                <artifactId>logback-classic</artifactId>  
                <version>${logback.version}</version>  
           </dependency>  
           <dependency>  
                <groupId>javax.mail</groupId>  
                <artifactId>mail</artifactId>  
                <version>${javax.mail.version}</version>  
           </dependency>  
      </dependencies>  
 </project>  

You only have to add an appender with the configuration of the sender:

 <?xml version="1.0" encoding="UTF-8"?>  
 <configuration>  
      <appender name="CONSOLE" class="ch.qos.logback.core.ConsoleAppender">  
           <encoder>  
                <pattern>%d{HH:mm:ss.SSS} [%thread] %-5level %logger{36} - %msg%n</pattern>  
           </encoder>  
      </appender>  
      <appender name="EMAIL" class="ch.qos.logback.classic.net.SMTPAppender">  
           <smtpHost>smtp.gmail.com</smtpHost>  
           <smtpPort>587</smtpPort>  
           <STARTTLS>true</STARTTLS>  
           <username>YOUR_MAIL@gmail.com</username>  
           <password>PASSWORD</password>  
           <to>DESTINY_EMAIL@DOMAIN</to>  
           <from>YOUR_MAIL@gmail.com</from>  
           <subject>Testing: %logger{20} - %m</subject>  
           <layout class="ch.qos.logback.classic.PatternLayout">  
                <pattern>%date %-5level %logger - %message%n</pattern>  
           </layout>  
      </appender>  
      <root level="TRACE">  
           <appender-ref ref="CONSOLE" />  
           <appender-ref ref="EMAIL" />  
      </root>  
 </configuration>  

  1. Replace the existing logger
Many times we should trade with code that logs with many different libraries. It's a common situation when we are dealing with legacy code of our business that not uses Slf4j or we have a dependency with a library that uses it. In these cases we have to look for an Slf4j (or many ones) adapter that matches with the library calls and redirects to our infrastructure.
Let's have a look to this example. In this one, we have a legacy code that logs with Log4j and we want to replace it to Logback with Slf4j.

  1. pom.xml with Log4j dependency
 <project xmlns="http://maven.apache.org/POM/4.0.0" xmlns:xsi="http://www.w3.org/2001/XMLSchema-instance"  
      xsi:schemaLocation="http://maven.apache.org/POM/4.0.0 http://maven.apache.org/xsd/maven-4.0.0.xsd">  
      <modelVersion>4.0.0</modelVersion>  
      <groupId>gazpachito.examples</groupId>  
      <artifactId>logging</artifactId>  
      <version>0.0.1-SNAPSHOT</version>  
      <properties>  
           <log4j.version>1.2.17</log4j.version>  
      </properties>  
      <dependencies>  
           <dependency>  
                <groupId>log4j</groupId>  
                <artifactId>log4j</artifactId>  
                <version>${log4j.version}</version>  
           </dependency>  
      </dependencies>  
 </project>  

In this case, Maven will only download the Log4j jar file.

 [INFO] --- maven-dependency-plugin:2.8:tree (default-cli) @ logging ---   
 [INFO] gazpachito.examples:logging:jar:0.0.1-SNAPSHOT            
 [INFO] \- log4j:log4j:jar:1.2.17:compile                   

  1. Copy the following code.
package gazpachito.examples.logging;  
import org.apache.log4j.Logger;  
 
/**  
 * @author jmporterog  
 */  
public class LegacyApplicationLoggingExample {  
      private static final Logger LOGGER = Logger.getLogger(LegacyApplicationLoggingExample.class);  
      /**  
       * @param args  
       */  
      public static void main(String[] args) {  
           LOGGER.trace("TRACE message");  
           LOGGER.debug("DEBUG message");  
           LOGGER.warn("WARN message");  
           LOGGER.info("INFO message");  
           LOGGER.error("ERROR message");  
      }  
 }  
  1. Use the following log4j.xml
 <?xml version="1.0" encoding="UTF-8" ?>  
 <!DOCTYPE log4j:configuration SYSTEM "log4j.dtd">  
 <log4j:configuration xmlns:log4j="http://jakarta.apache.org/log4j/">  
      <appender name="console" class="org.apache.log4j.ConsoleAppender">  
           <param name="Target" value="System.out" />  
           <layout class="org.apache.log4j.PatternLayout">  
                <param name="ConversionPattern" value="%d{dd MMM yyyy HH:mm:ss} %5p %c{1} - %m%n" />  
           </layout>  
      </appender>  
      <root>  
           <priority value="trace" />  
           <appender-ref ref="console" />  
      </root>  
 </log4j:configuration>  
  1. If you run the application it will show the following output.
 26 ene 2014 21:40:39 TRACE LegacyApplicationLoggingExample - TRACE message  
 26 ene 2014 21:40:39 DEBUG LegacyApplicationLoggingExample - DEBUG message  
 26 ene 2014 21:40:39 WARN LegacyApplicationLoggingExample - WARN message  
 26 ene 2014 21:40:39 INFO LegacyApplicationLoggingExample - INFO message  
 26 ene 2014 21:40:39 ERROR LegacyApplicationLoggingExample - ERROR message  

In this case, the calls to the logger are more direct. In the following diagram you can see the different calls.
Figure 3: Log4j basic class diagram.

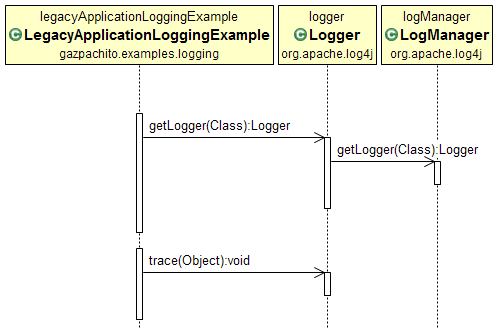
Figure 4: Log4j basic sequence diagram.

To redirect the calls of Log4j to Logback we only have to replace the pom.xml for this one.

<project xmlns="http://maven.apache.org/POM/4.0.0" xmlns:xsi="http://www.w3.org/2001/XMLSchema-instance"
    xsi:schemaLocation="http://maven.apache.org/POM/4.0.0 http://maven.apache.org/xsd/maven-4.0.0.xsd">
    <modelVersion>4.0.0</modelVersion>
    <groupId>gazpachito.examples</groupId>
    <artifactId>logging</artifactId>
    <version>0.0.1-SNAPSHOT</version>
    
    <properties>
        <logback.version>1.0.13</logback.version>
        <slf4j.version>1.7.5</slf4j.version>
    </properties>
    
    <dependencies>
        <dependency>
            <groupId>ch.qos.logback</groupId>
            <artifactId>logback-classic</artifactId>
            <version>${logback.version}</version>
        </dependency>
        <dependency>
            <groupId>org.slf4j</groupId>
            <artifactId>log4j-over-slf4j</artifactId>
            <version>${slf4j.version}</version>
        </dependency>
    </dependencies>
</project>

As you can see, we have replaced the original Log4j jar and we have included log4j-over-slf4j. This includes the public classes with the same names and packages but it redirects all the calls to Slf4j and then to Logback. We can redirect the calls to another one of course and include adapters of many other logging libraries.

The result of this change can be reflected in these diagrams.

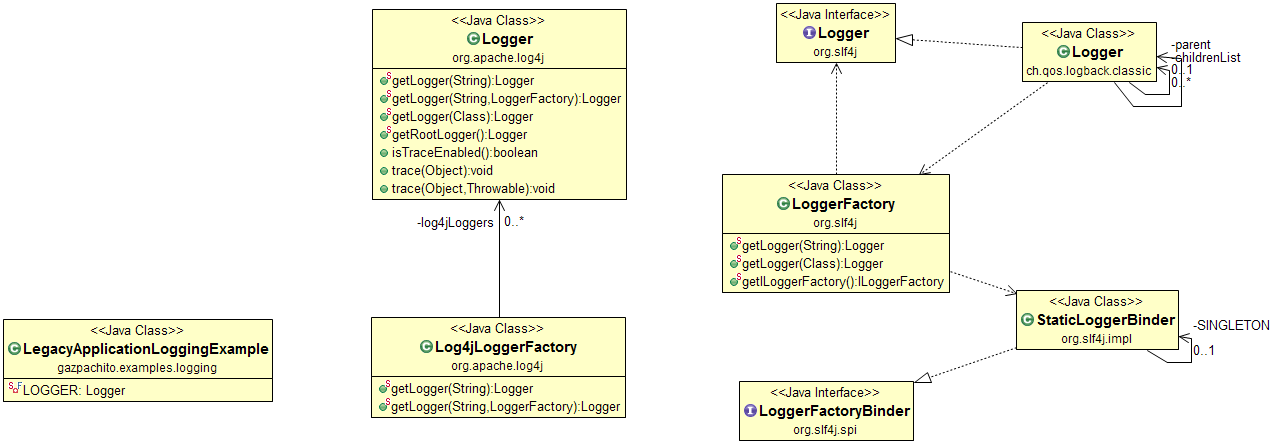
Figure 5: Class diagram with the main involved entities. In this case the classes in the package org.apache.log4j.* are not the same than the Figure 3.

Figure 6: Sequence diagram. Notice the difference with figure 4 and the new calls.
  • Conclusions
Slf4j allows us to solve the jungle of logging frameworks in a complex software application. With a correct combination of adapters and a good configuration of the main loggers you will trace all the important messages of your application.